|
|
|
|
Playfield Restoration FAQ V1.2
The instructions on this page are basic guidelines and are not guaranteed to work in any way. I merely collected as much info from newsgroup articles and personal e-mails covering the subject.
Special Note: This document is quite old nowadays, I would suggest checking out Clay's Playfield Restoration FAQ as well for some more up to date information.
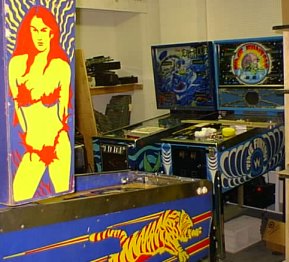
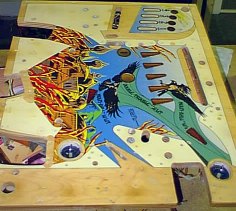
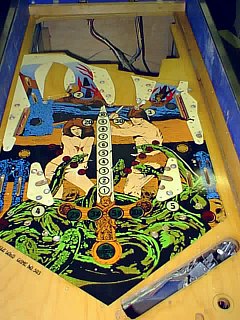
In the past and then again recently, I have come across games from the early 80's with pretty decent playfields (PF's). I really wanted to keep them in the best condition possible while I owned them since replacement New-Old-Stock PF's are getting harder to come by now a days. I considered cleaning them and putting a nice heavy sheet of mylar over the whole PF but I never liked the way that pinballs rolled over mylar and the inevitable matte finish that mylar gets after many years. Mylar also seems to make the game play a bit slower. So I ended up deciding to 'overspray' my existing PF (Im told that Im not actually re-finishing the PF since that would entail stripping off the old finish which would be next to impossible) and bring it back to life. This topic has been coming up on the newsgroup... RGP (Rec.Games.Pinball) every now and again so I figured I would write up a FAQ to cover all the questions that I have seen and hopefully provide answers. I will also show some pics of my restoration of my Williams Jungle Lord as well. Okay, on with the show..
Do you really need to do this?
Ask yourself these questions:
- Will your game get so much playtime that keeping the PF clean and waxed won't be suitable protection? Once a pinball machine is off location and in the house, the stress you put on the finish of the PF is very minimal compared to an arcade or street location. Keeping your game well waxed and clean (plus keeping a fresh ball in play) will generally be enough protection that you will not have to worry about your paint wearing thin for a LONG TIME!
- How much time will be involved in actually overspraying the PF? Stripping all the parts off the PF and getting it prepped for overspraying takes alot of time. I probably spent a total of 30 hours over a 3 week period to do my single level Bally Fathom. On the other hand, after doing the Fathom, doing the Jungle Lord took much less time.
Getting Started
There are basically three sections of PF restoration, some of these may not apply to your situation but depending on the condition of the PF that you are trying to restore there may be other steps involved.
- Remove all items off PF - If you really want to restore your PF you will have to remove Everything from the top first. All posts, wireforms, drop targets, Pop bumpers and rollover inserts. Trying to restore the PF without doing this is IMPOSSIBLE.
- Old Mylar Removal - If a previous owner or operator noticed the PF starting to wear, they may have put mylar on the PF in small areas or even the whole thing. Some PF's also came from the factor with mylar already installed. PF's like this are nice to find but you may notice that the mylared areas are perfect whilst the non-mylared areas are worn very badly. This was sort of the case with my Fathom.
- Paint Touch-Up - If you have spots that are already worn through, you may want to consider fixing these areas up before finishing. Once a layer of Polyurethane is put down you can forget about ever going back to re-touch the painted surface. This is also a good time to take care of loose or uneven lamp inserts.
- Preping the PF - This step is very important, before overspraying the PF must be extremely CLEAN. Waxes or other protective coatings will prevent the new finish from sticking.
- Restoring (Overspraying) - What we intended to do before all this other "stuff" came up.
Clearing the PF
This is probably the most technical part of restoring your PF. It involves taking off so much stuff that the resulting pile can be pretty intimidating. If you don't think you can put all these items back on try the following....
- Take lots of pictures.
- Take good notes on where you desoldered wires (better yet, have a schematic).
- Keep your screws etc. in little baggies for each assembly and label them.
Basically there aren't many particulars for doing this step, you just have to get it all off.
Removing Old Mylar
Taking off old mylar can either be pretty easy or very difficult. It mostly depends on the state of the PF when it was put on. PF's in good condition with no flaking paint can have the mylar removed without pulling up ANY paint at all. However, if your PF was getting a bit flaky when the mylar was put down to protect it, you can have real problems getting it off without totally ruining the PF underneath. You may want to try pulling the mylar off in a inconspicous spot first to see how your paint will behave.
Mylar can be pulled of with the assistance of a hair dryer, Do not use a heat gun, you are only asking for trouble. Heat guns will melt lamp inserts. The trick with the hair dryer is to warm up the adheisive enought that it becomes gooey, it will let the mylar peel off the PF much easier. When pulling of the mylar do it very slowly, the faster that you go the more likely you will pull up paint. The mylar will most likely come off and leave the adheisive behind on the PF, don't worry about this we will get it off later. If you are lucky the mylar will bring the adheisive with it and you will have some very minor cleanup to do.
Once you get the mylar off, all that adheisive has to come off as well. In my experience Rosignol Lighter Fluid works the best!! It is harmless to plastics and even the existing
finish and underlying paint, but it sure does work with sticky glue.
Corey Stup wrote this comprehensive info:
I've (recently) tried using all sorts of products to help with the glue
removal.
Wildcat TR-60: Doesn't do much by itself. Didn't lift the glue, but
worked great as an "after clean". I would use this to remove the
harsher cleaners, and just help clean up. Petroleum based. Consistancy
is very thin - almost like water. Seems like it would be a good
overall cleaner, to remove "less sticky" residue.
Goo Gone: This is available everywhere, including Kmart and Wall-mart.
Worked the best of the petroleum based products. Took a LOT of
elbowgrease to get anywhere, though. Thicker than TR-60. I use this
all the time for removing those damn auction stickers USAA insists on
using. The "citrus power" may actually work - I know it at least
smells better.
CP-200 (Blue Stuff): Seemed close to TR-60. Didn't do much for glue
removal. Worked well as a general cleaning agent.
M1: Picked this up at the local HQ. Worked well, although not as good
as Goof Off. Better than the petroleum-based ones. Non-petroleum
based product. Very strong smell - use outdoors!
Goof Off: Worked the best for my projects. Its a little harsh, so you
have to be careful what you get it on (make sure you take all plastics
off first). But, its able to wipe away mylar glue with very little
effort. I then use TR-60 as a cleaning agent for the Goof Off. Wipes
the playfield down REALLY clean. Non-petroleum based.
WD-40: I wouldn't recommend WD-40 for anything. That oil would make a
mess. I don't even use it as a oil. I hate WD-40.
Bob Ellingson posted what seemed to be the best suggestion...
I know I have posted this before, and I can't be the only one who knows this: Use Ronsonol
Cigarette Lighter Fluid to take off glue. It works great, and does not affect paint or plastic.
It works on all kinds of sticky residue from labels, stickers, etc. as well many inks, like from
felt pens, as well as the ca-ca left behind by our old friend Playfield Mylar. It's cheap and
not particularly nasty smelling. By comparison, that Goof Off spray (which is benzine, by the
way) is really horrible, makes my eyes burn if I come into the same room where it has been used.
I would not be without a bottle of Ronsonol (Zippo Fluid does not seem to work as well). Try it.
On my Bally Fathom, I ended up using the Lighter Fluid with great success. I used a 2'x3' towel that I bought at Wal-Mart for $1. The Lighter Fluid was $2.69. I probably used about 2/3 of the bottle to do the major portion of my PF and it only took about 1 hour. Scrubbing the adhesive with a soaked towel and also squirting lighter fluid directly onto the adhesive let it soften up quite a bit. After the adhesive was really gooey from the lighter fluid I took a dry section of the towel and wiped it up with strong pressure, I did this process on a 2"x2" section at a time. The dry towel will actually stick to the adhesive and pull it off the PF, soaking the wood and paint with lighter fluid didn't seem to hurt it at all. After getting up all the adhesive, a quick once over with a lighter fluid soaked rag buffed the PF to a nice shine.
Touch Up
I really didn't do much touch up on my PF because Im not a painter, so I will mostly quote other people on this subject. One item that nobody mentioned for touch up was a black sharpie. I have been using these since I was 13 to fix the worn black rings around each lamp insert. Sharpies are nice because they are easy to use, very permanant (Lighter Fluid will remove the ink a bit however) and they don't add any height to the PF like thicker paints. NOTE: Im now becoming a bit wary about the Sharpie approach. Varathane Diamond Finish will make the ink bleed somewhat, but the non-water based polyurethanes didn't.
Basically there have been two types of paint mentioned on RGP for excellent results. First was Testors Hobby Paint. It comes in those small little bottles in many many colors. People had mixed results with trying to match the paint however. The Testors paint may be a bit more durable than other paints but that really doesn't matter if you are going to put a final hardcoat over the top anyway.
The other option is to use Artists Acrylic Paints. These are ususally found at either crafting stores, larger hobby stores or Artist supply stores. Im not sure who has the best prices amongst them though. I buy mine at Hobby Lobby and they have decent prices. University Book Stores will have them too, but they will be more expensive there. The biggest advantages of Acrylic paints are their soluablility in water when wet and the HUGE amount of colors available. You probably won't get away with finding an exact color so you will still have to mix colors to match. Acrylics have a nice creamy texture to them and because they are water soluable they are a bit more forgiving when it comes to amatures (like me!) trying to mix colors.
Ray S. had this to say...
Now for the fun part ;). I obtained a bunch of clear 35mm film containers with caps (free from a photo store at the mall,
people bring in film for processing and they had bushels of them). I used these to mix up small batches of acrylic paint to
match the colors on the playfield. The paint I use is obtained at any arts & crafts chain store for about $0.89 a bottle. They
have about 100 shades to choose from. The final quality of the playfield is directly proportional to the patience used
to get a perfect color match. Takes a knack, mix a little white, maybe a little red, a drop of orange, etc. The paint dries
slightly darker than when wet. Once the match is made, you can seal the container and save. I use the areas covered by the
rails as test sites. It takes lots of patience and much trial and error to achieve a perfect match. The acrylic paint is great
because if your batch is too far off color-wise, it's water soluble, just rinse it out in the sink and start over. I use a very fine
artist's brush to fill in every tiny chip, crack, or gouge using the paint very sparingly. Very worn areas may get 10 coats
because the acrylic paint dries hard and I use it like Bondo, building it up and sanding it down like filling a dent in a fender.
Takes a steady hand and a deep breath to do some of the thin black lines or numbers! Make a mistake? Quick, wipe it off
with a damp rag. When the painting is complete and dry (at least 24 hours), I wet sand everything level with superfine 600 grit
wet/dry silicon carbide paper. Do a final inspection, there's no turning back once you apply the finish.
Lamp insert problems
All the heat under the PF can also lead to warping or loose lamp inserts. Luckily my Fathom only had loose inserts. These can be popped out and the old glue sanded off with 600 grit sandpaper. When putting them back in, use Elmers Wood Glue on the inside of the PF hole, near the bottom. If it gets messy and you get glue on the top of the PF, no worry, Elmers is always water soluble. Just use minimal amounts of warm water on a cloth. Too much water is bad for the PF!
One thing that I did on my Fathom with excellent results was to pop out all the "star" type rollover inserts. These are translucent plastic in either amber, red or blue. The old finish on them looked terrible and was flaking away, I didn't want to just recoat them. I took some 600 grit sandpaper and gently sanded their faces until the old finish was gone and they were completely smooth. I washed them gently with soap and water using an old toothbrush to clean the undersides. Glue them back in. They look completely immaculate now.
If you have problems with uneven lamp inserts... cfh had this to say...
Plastic inserts: remember, heat them up from the BOTTOM of the
playfield, not the top! then take a piece of Lexan, lay it
over the TOP of the playfield, and pound the crap out of the
Lexan with a rubber mallet till the insert is flush. let it cool.
then from the BOTTOM of the playfield, use just a little
"water thickness" super glue around the edge of the insert to
hold it in place forever.
Prepping the PF
This is sort of the hidden step in restoring your PF. Special thanks to Clay (cfh) for taking the time to expain this and also for sharing his seemingly endless knowledge of 'finishing'.
well i would do a few other things in the whole prep process.
- after removing the parts, first wipe the whole playfield
down with alcohol. Reason: WAX. old wax will cause a SERIOUS
adhesion problem, and you'll get "orange peel" at minimum,
and "fish eyes" at worse. alcohol should get that off. do it
BEFORE you do any wet sanding.
- i would BLOCK SAND the playfield right after the above. it
will take any high spots out. but don't go too crazy; you
don't want to block sand thru any of the original color.
use a hard piece of maple for a block. DO NOT use a softer
material. use alcohol for the wet.
- after block sanding, i would wet sand (with alcohol) the
whole playfield. alcohol because it will not raise the
grain and cause problems. you used lighter fluid; that works
too but alcohol is a purer substance, and leaves less
impurities behind.
- another product that works GREAT for removing wax is
NAPTHA. i can't believe i forgot to mention this product.
you can get it anywhere, and it won't wreck the old
playfield paint. you can use Alcohol, but NAPTHA is the
stuff that works best to remove old wax.
Ray S. commented on this...
I WET sand by hand (gently with care!!) the entire playfield with 400 grit silicon carbide wet/dry sandpaper (auto parts
store) taking care not to penetrate the existing coating too far and damage the paint. Do not to leave the surface wet for too
long. Give it a good sanding and damp sponge off the crud. Wipe dry with a cloth. This gets rid of old wax, ground-in dirt,
and does knock off paint flakes if the wood is cracked. Not to worry. You now have a nice surface to work with, clean and
level, although hazed from sanding. I also try to sand out a little (even out) the groove worn into the wood by the ball. One
playfield had water damage to the point that in spots the wood was black. I used Clorox bleach to lighten the wood. Dampen
only the spots with bleach using a Q-tip, let set for 5 min., then wipe off with a damp sponge. Doesn't bring it back
completely, but it helps. I think it kills the rot.
NOTE:Ray uses water to wet sand the PF I believe. I have found that the water can raise the grain of the wood significantly if it gets to bare wood. On my second restoration I used 600 grit Silicon Carbide Sandpaper and wet sanded with Rosignol Lighter Fluid, remember the lighter fluid doesn't harm the lamp inserts or erode the finish at all. Sanding the entire PF with this method gave a very smooth dull finish and even took out all the 'ball dents' in the old finish. Remember to sand in one direction only, no circles.
Restoring the Playfield (Overspraying)
Okay, if you have reached this point you are doing pretty well. The PF should be completely prepped and ready for a first spray on coat of finish. This is where the question of "What do I use?" comes up. Basically through all the posts and experiences of people that have posted to the newsgroup, the consensus is to use a water based (non-yellowing) spray on type of polyurethane.
Here are some accounts of what NOT to do...
Russel Willoughby wrote...
I did a brush-on polyurethane job on my Flash a few years back, and it
ended up looking okay, but not great. I did get some visible brush strokes
and small air bubbles, but nothing horrendous.
Mike1963 wrote...
I tried Clear Enamel spray over a small area. Man, that was a joke. The
clear flaked-off in no time and was a mess (don't try this).
Here is an account of how to CORRECTLY overspray your PF. I added my comments below in green.
Ready for the finish. I buy a one quart can of clear gloss Varathane Diamond Finish. Expensive, but THE best. DO NOT
USE REGULAR VARATHANE!!!! Regular Varathane is an oil based polyurethane like Min Wax. You'll have a stinkin',
uneven, dust encrusted mess!!! The Diamond Finish stuff is a water based polymer, 4 times harder, dries fast (3 hr.?) and is
compatible with the acrylic paint. Water clean-up. I used foam rubber brushes and applied a generous coat nice and slow to
cut down on bubbles. I put the playfield on blocks as level and sturdy as possible in a dust free area. Stir up the Diamond
finish, but don't make bubbles. Try to apply the finish from top of field to bottom, in one very slow motion. Try not to go
back over a strip once it's laid down. Go about 12 inches, stop, reload the brush, and pick-up where you left off. Go right
over the holes. Try for a slight overlap of adjacent strips or you might get ridges. When done with the application you should
have a nice even milky white finish. There may be some bubbles, most go away on their own. Sometimes blowing on them
gets them to burst, but easy does it or you'll have a crater!
NOTE: I used spray on Varathane Diamond Finish instead of the brush-on. It worked AMAZING and left absoloutly no brush strokes (of course). I would recommend the spray-on over the brush-on simply because it was very easy, if the PF is correctly leveled when you put on the coats, you won't get any runs either. :-)
 In about 3 hours, you'll be blown away by a bright new crystal clear finish. Let dry 24 hours, wet sand with 600 grit to
roughen the surface good. I know, I know, you seem to be trashing a great finish. Apply coat #2. Let dry 24 hr.. Now look
things over and decide if you want to go for coat #3. If so, you have to sand thoroughly 600 grit!! You'll have a mess if you
don't sand because the Diamond finish does not flow well over a shiny finish, and it's very hard to see where you stopped and
started with the brush and may leave a "bare" spot. Let dry a couple of days. Remember, mistakes can be fixed with
sandpaper and elbow grease. Let dry a couple of days, and reinstall the hardware.
In about 3 hours, you'll be blown away by a bright new crystal clear finish. Let dry 24 hours, wet sand with 600 grit to
roughen the surface good. I know, I know, you seem to be trashing a great finish. Apply coat #2. Let dry 24 hr.. Now look
things over and decide if you want to go for coat #3. If so, you have to sand thoroughly 600 grit!! You'll have a mess if you
don't sand because the Diamond finish does not flow well over a shiny finish, and it's very hard to see where you stopped and
started with the brush and may leave a "bare" spot. Let dry a couple of days. Remember, mistakes can be fixed with
sandpaper and elbow grease. Let dry a couple of days, and reinstall the hardware.
Well, I really dont' have much else to add to Ray's description for now. I just finished the lower level of my Jungle Lord and Im in the process of sanding down the upper level. It is amazing how fast the Varathane Diamond Finish dries. After everything has dried for two days or so (longer the better) put some high quality Hard Carnuaba Wax and polish up the PF, it will make the PF very smooth and fast.
Clay also had this to add...
- after it dries for a zillion days, i would do the following:
- block sand again with 600. this will make the playfield
PERFECTLY flat. when all is level and perfect, change
to 1200 and then to 2000. you can use alcohol or water
at this point; the playfield is sealed. but alcohol would
be a MUCH better and safer choice.
- Novus the playfield with #3, then Novus #2.
- if you want, finally use Novus #1.
- it will shine like a new playfield, and be so smooth it
will make your girlfriend jealous...
If anyone has any comments or think something should be added just drop me an e-mail.
 These are the threads on RGP that most of this info was extracted. I would like to thank everyone that contributed to this topic since it has helped me and probably many many others.
The thread info was extracted using Dejanews, a very handy Usenet tool.
These are the threads on RGP that most of this info was extracted. I would like to thank everyone that contributed to this topic since it has helped me and probably many many others.
The thread info was extracted using Dejanews, a very handy Usenet tool.
- Varnish, Lacquar or polyurethane on Playfield - Quen4evr 1998/02/08
- Restoring Playfield w/Polyurethane? - MIKE1963 1997/07/28
- Re: Restoring Playfield w/Polyurethane?
|
|
|
|
|